Make your own superflower
This tutorial allows you to conduct your own supernatural flower workshop using a lamp, decorations and electronics.
Download the tutorial
Background
This workshop was designed as part of the installation The Timid Wilderness, created by South African artist Miranda Moss as part of the Les Voyages de Capitaine futur European cooperation project.
The Timid Wilderness is a garden of bioluminescent flowers deep in an ultraviolet radiance. The flowers are sensitive to sound – if someone makes too much noise, they hide away, closing their electronic petals and waiting for silence before blooming again.

Summary
This workshop allows you to create a flower with extra-brilliant properties, called Flaminou. All you have to do is follow the steps. The workshop can be done as a family, at school, or in a group.
Make your own superflower is an introduction to the principles of electricity, the fundamentals of construction and the magic of assembly. It explores the basics of programming electronics with Arduino.
Details
- Ages: 6 to 12
- Duration: 1.5 to 2 hours (depending on level of difficulty)
- Adult assistance required (involves electrical wiring)
- Cost: about €30
Aims
While children must be assisted throughout, their active participation in the workshop is central – they learn by doing and making themselves, alone or as part of a group.
The main aim of the workshop is to introduce children to a creative use of technology and to show them how it works through a few simple mechanisms and techniques.
The workshop can be done at school or at home, with a teacher or parent. When different generations work together, they gain a better understanding of our digital environment together and their roles may be reversed. The workshop teaches through art, play and practice.
Materials
-

1 E14 socket with switch and plug
-

1 light bulb
-

1 clean glass bottle with large neck
-

Sand
-

Gel sheets in various colours
-

Artificial leaves and flowers
-

1 Arduino UNO
(or compatible) -

1 HC-SR04 ultrasonic sensor
-

1 Power Relay
(Songle srd-05vdc-sl-c) -

1 9V battery
-

1 9V battery connector
-

1 breadboard
-

Jumper cables
-

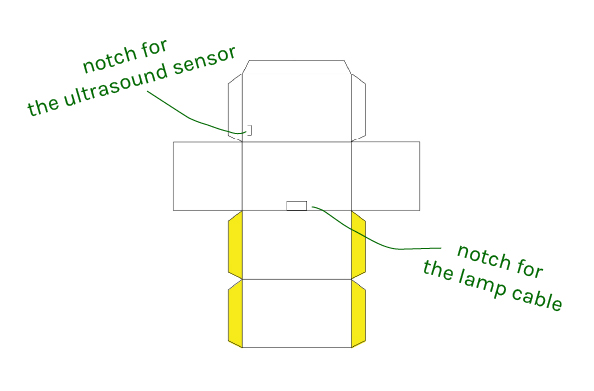
1 A3 sheet of 224g Canson paper printed with the box template
Tools
-

Scissors
-

Box cutter
-

Wire cutter
-

Wire stripper
-

Small screwdriver
-

Scotch tape
-

Electrical tape
-

Glue
Step 1
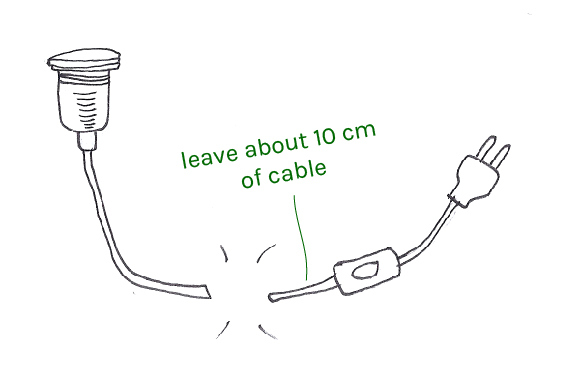
Prepare the lamp and build the box
Adult
→ Use the wire cutter to cut the lamp cable in the section between the socket and the switch.
Child
→ Cut out the box pattern using scissors.
Step 2
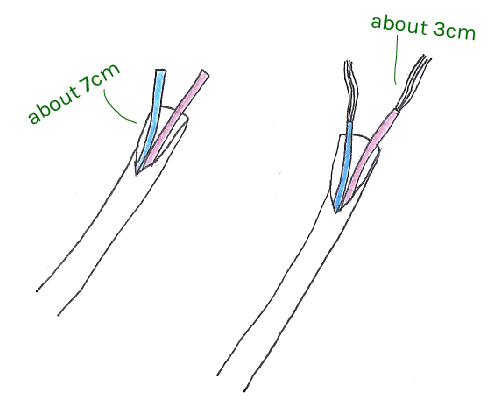
Make the roots
Adult
Child
Connect the ultrasound sensor to the Arduino
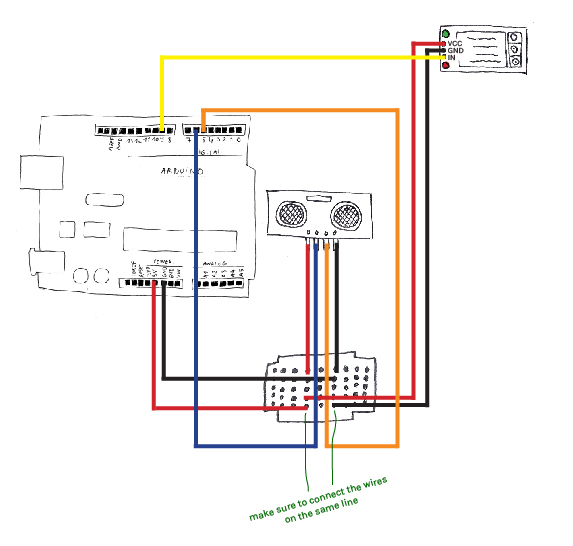
We will use an ultrasound sensor to measure the distance between Flaminou and anyone who comes close to it. As we can see, there are four pins on the ultrasound sensor: VCC, TRIG, ECHO and GND.
We will now connect the ultrasound sensor to the Arduino with the jumper cables, via the breadboard, as shown in the diagram below:
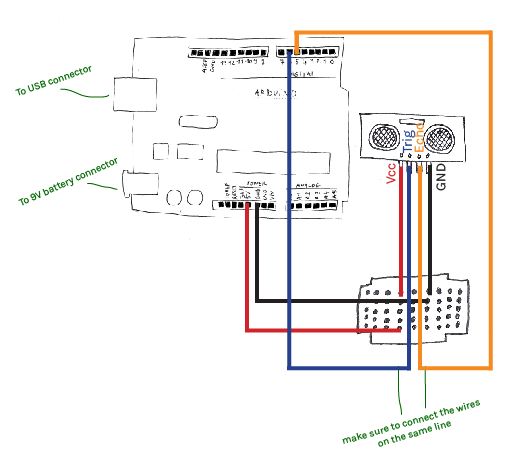

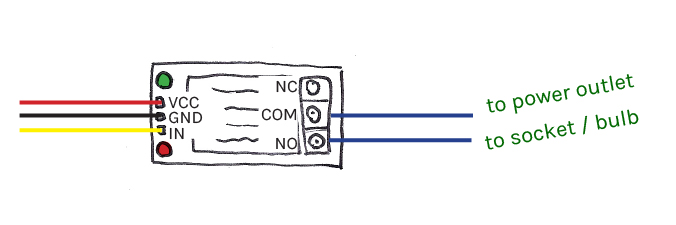
We can see three pins on the relay: GND, VCC and IN.
Send the program and test the circuit
→ Before connecting the lamp, we will first test the circuit and the code.
→ Open the Arduino software on your computer. If you haven’t installed it yet, you can download it here: arduino.cc/en/Main/Software. Copy and paste the code below:
// Using the HC-SR04 to detect movement within 13cm and turn on the lampdefine trigPin 6 //HC-SE04 trigger pin 6 on the Arduino
define echoPin 5 //HC-SE04 echo pin 5 on the Arduino
define bulb 9 //Power Relay pin 9 on the Arduino
int approche = 13; // Defines the number of centimetres for turning the lamp off/on
void setup(){
Serial.begin(9600); //Turns on the serial monitor
pinMode(trigPin, OUTPUT); //Assigns the trigpin to the output
pinMode(echoPin, INPUT); //Assigns the echopin to the input
pinMode (bulb, OUTPUT); //Assigns the lamp to the output
}void loop(){
int duration, distance; //Defines two whole variables: duration and distance
digitalWrite(trigPin, HIGH); //Writes a HIGH signal to the trigpin to send the ultrasound
delayMicroseconds(500); //Waits half a millisecond
digitalWrite(trigPin, LOW); //Measures the amount of time between when the signal is sent and received
(when the echopin receives the signal)
distance = (duration/2) / 29.1; //Calculates the distance. Duration divided by 2 because the signal passes from the trigpin to the echo pin and then is divided by 29.1 to convert the figure into cmif (distance < approche){ //If the distance is smaller than the value
digitalWrite(bulb, HIGH); //Turns on the lamp
}
else{
digitalWrite(bulb, LOW); //Otherwise turns off the lamp
}
Serial.print(distance); //Displays the distance on the serial monitor
Serial.println(« CM»); //delay in centimetres(500);
delay(500); //waits half a second
}
→ Connect the Arduino and upload the code above.
→ Unplug the Arduino from the computer and use the connector to plug the battery into the battery input on the Arduino. The green and red lights on the relay should turn on. When you place an object within 13 cm of the ultrasound sensor, the green light should turn off.
Once the electrical circuit is functioning correctly, install the various elements in the paper box that you put together earlier. The ultrasound sensor should stick out of the top of the box and the relay should be accessible.
Step 3
Become Flaminou
Adult
Connect the lamp
→ Connect two wires of the same colour together (it doesn’t matter which ones) and attach them with electrical tape. The tape should cover the bare wires so that they don’t stick out.
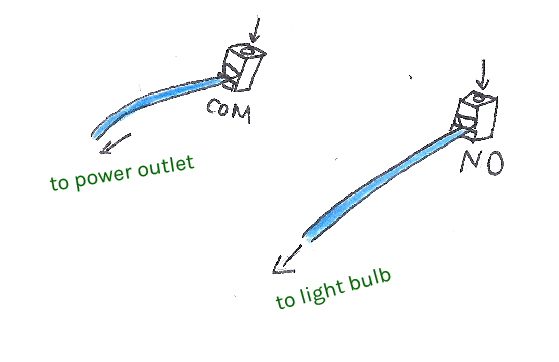
→ Now we’re going to work inside the paper box. Connect the two other wires to the relay using a small screwdriver. The wire with the power plug connects to COM on the relay and the wire with the socket and light bulb connects to NO on the relay.
→ Make sure that the cables aren’t touching each other.
→ Secure the cable with electrical tape – use a lot if you need to!
Test the circuit
WHATEVER YOU DO, DO NOT TOUCH THE RELAY OR THE POINTS WHERE THE CABLES ARE CONNECTED!
→ The lamp turns on and then turns off when we are less than 13 cm from the sensor.
Child
Prepare the decoration
→ Fill the bottle with sand (using a funnel, if needed).
→ Decorate the bottle as you see fit. You can put things inside and glue the fake flowers or other decorations onto it.
→ Use scissors to cut the gel sheets so that they form the shape of a flame when your wrap them around the light bulb and socket.
Step 4
Flaminou is ready for you
Adult
Child
→ Glue the flames around the lamp socket.
→ Insert the socket and light bulb into the neck of the bottle and position them so that they stay in place.
→ Finish decorating Flaminou.

Credits
The “Make your own superflower” workshop was designed by children at Lab School Paris during the 2017-2018 school year, with support from Sarah Garcin and the La Gaîté Lyrique team, as part of the Les Voyages de Capitaine futur European cooperation project led by La Gaîté Lyrique, Cinekid, KIKK and WoeLab.
For more information, contact: info@capitainefutur.voyage
This tutorial is presented under a Creative Commons Attribution - ShareAlike 2.0 France (CC BY-SA 2.0 FR) license. Anyone is free to conduct this workshop under their own responsibility.
creativecommons.org/licenses/by-sa/2.0/fr